

It's Thanksgiving time, and my thoughts turn to pumpkin pie. I love pie but the traditional wheat crust just does not agree with me. Since I hit my mid-40s I began having severe intestinal distress whenever I ingest gluten grains. And I'd much rather live without severe nausea, diarrhea, daily vomiting, depression, and stiff and aching joints, thank you very much! I get all those symptoms where I eat gluten grains, and they all vanish when I banish them.
So I have experimented with alternative pie crusts, and most have been nasty. I can't *stand* the "so-called" gluten-free mixes you can pie in the stores - usually full of nasty cr*p I don't want to eat anyway. I've tried almond meal crusts were are okay, but just don't have the texture of pie crust!
But this week I finally came up with a recipe that is gluten free, but also rolls out like real pie crust, has a similar texture to real pie crust, and tastes good too! This is how the crust looked after I rolled it out with the rolling pin between two sheets of waxed paper:
 So this is the recipe I came up with:
 Gluten-free pie crust
 It looks a bit messy as I didn't add *quite* enough oil. But at this point I'm ready to add the pumpkin filling, which I made using this recipe:
 Then bake at 350 until the pie is lightly browned on top and firmish to the touch in the middle (not jiggly). In my oven this takes about 45-50 minutes or so, and comes out looking like this:
 So that's my pie all ready for Thanksgiving tomorrow, and will be served with nice fresh whipped cream too. Yum.
3/4 cup coconut flour
1/4 cup peanut flour
1/4 cup macadamia nut oil (can use light olive oil, or melted coconut oil too, have tried both)
1 tbsp heavy cream
1 tbsp water
1/2 tsp salt
Combine all ingredients in a bowl and blend until the ingredients all come together in a ball. If it seems too loose and floury slowly add a little more oil, a teaspoon at a time - rarely you might need another tablespoon or so of oil.
Place the ball on a sheet of wax paper, squash it down a bit, then place a second sheet on top, and begin rolling with a rolling pin as you would any crust, rolling out on all side until you have a round crust big enough for the pie pan, as in the picture above.
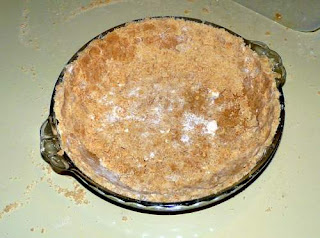
Then remove top paper, place pie pan over the crust, and then flip so that the pan is on the bottom and the paper on top, and slowly peel the wax paper off the back of the crust. This part does not work quite as well as with a wheat crust, but if it comes apart a bit you can just press it back together with your fingers when it's in the pan, and then use fingers or a fork to crimp the crust at the top edge of the pan just for "pretty". :-) That's the stage my crust is in in the following picture:
 It looks a bit messy as I didn't add *quite* enough oil. But at this point I'm ready to add the pumpkin filling, which I made using this recipe:
 Pumpkin Pie
1 small (15 oz) can of plain packed pumpkin
1 cup heavy cream
2 eggs
1 tbsp molasses
1/2 cup Truvia
2 tsp ground cinnamon
1 tsp ground ginger
1/4 tsp ground clove
1/4 tsp ground mace or nutmeg
pinch of salt
Blend all together in a large bowl using either a whisk or a hand-mixer. When all is blended pour into the prepared crust as below. Here is the pie ready to go into the oven:
 Then bake at 350 until the pie is lightly browned on top and firmish to the touch in the middle (not jiggly). In my oven this takes about 45-50 minutes or so, and comes out looking like this:
  So that's my pie all ready for Thanksgiving tomorrow, and will be served with nice fresh whipped cream too. Yum.
Note: pie crust recipe can be easily doubled for a double-crusted pie. I've also tried it with all coconut flour, but was not overwhelmed with the taste or texture.

No comments:
Post a Comment